

Greenscreen Layout Selector
Provides easy setup of multi layout selection for greenscreen mode in Breeze DSLR Remote Pro.
Installation and quick start
Please download and unpack the zip file into any folder on your computer.
Put your background image files into folder LayoutSelector\Layouts and name them BG_# (i.e. BG_1.jpg, BG_2.jpg, BG_3.jpg …).Start program LayoutSelector.exe with double click (hotkey icon appears in the task info section/checkbox on your monitor).
Open settings.ini with texteditor e.g. (Notepad++) and change trigger according to your profiles.
Example:
Assuming your profiles are named: MySelection (to present the offered alternatives, in this profile no background selection is needed), MyDoubleStripes, MySingleGuestbook, MyPerfectPartyphoto
Please replace in settings.ini as follows:
Trigger=Trigger|MyDoubleStripes\ready|MySingleGuestbook\ready|MyPerfectPartyphoto\ready
Aternatively just fill in:
Trigger=Trigger|Stripes\ready|Guestbook\ready|Partyphoto\ready
as the system will find part matches in terms here as well
Start LayoutSelector with double click on program file LayoutSelector\LayoutSelector.exe
Please note: changes in the settings.ini will be effected after a restart of LayoutSelector only.
To restart the application right click on icon in monitor check box (exit) or press “end” key on your keyboard and restart with double click on file LayoutSelector.exe in your LayoutSelector folder.
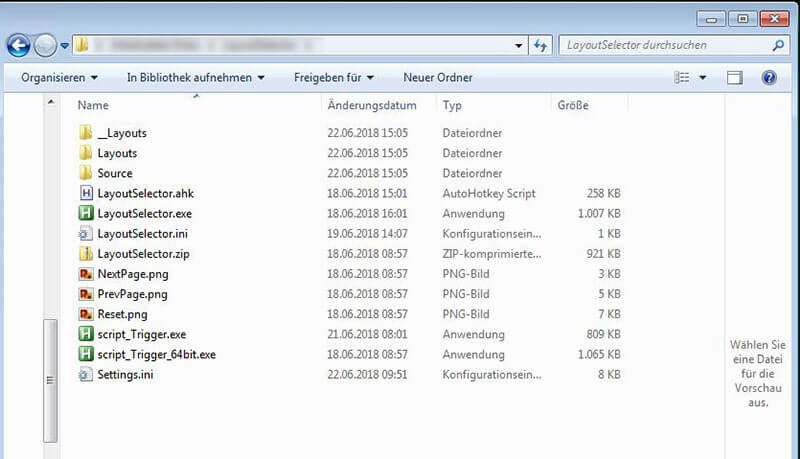
Folders and Files in Layoutselector
LayoutSelector\Layouts:
Contains background images and thumbnails.
Please always name your background images BG_# (i.e. BG_1.jpg, BG_2.jpg, BG_3.jpg …).
Sequence of background images shown on selection screen pages are according to file names (ascending order) in rows from left to right and from top to bottom.
Background images can be made available in folder LayoutsSelector in your DSLR Remote Pro profile image folder as well and can be used for different selections in each profile.
LayoutSelector\Layouts\Thumbnails:
Folder Thumbnails will be created automatically as soon as you start the background selection screen for the first time (you will see a hint on the top left of your screen showing „Please wait“). Thumbnails will be updated after any change in the Layouts folder (e.g. new or additional background image).
LayoutSelector\Source:
Contains audio files for actions like next and previous page, reset and select.
LayoutSelector\LayoutSelector.exe:
Program file. Start with double click on file LayoutSelector.exe in your LayoutSelector folder.
Exit application with right click on icon in monitor checkbox (exit) or press “end” key on your keyboard and restart.
LayoutSelector\LayoutSelector.ini:
This file is being created automatically by the application. It contains the settings about arrangement and size of thumbnails and icons on the screen.
LayoutSelector\NextPage.png, PrevPage.png, Reset.png:
Contains icons for browser functions on background selection screen.
SETTINGS.ini
All settings regarding layout and functions can be defined in the settings.ini.
Settings.ini can be edited with windows standard program Notepad++
Important: Changes in settings.ini will run after restart of LayoutSelector only !!!
Advice:
Copy your settings.ini file and rename it (e.g. settingsoriginal.ini) before you change any settings. So you can always go back to you original settings. A good recommendation also if you like to use and keep different settings.ini files
e.g. settingsmultiselect.ini, settingssingleselect.ini – just do not forget to rename them back to settings.ini before use.
TRIGGER(must be set):
Trigger calls the selector.jpg screen. There are different trigger options (see Different Options and Run script and Run script (password).
Use Trigger=trigger if script_Trigger.exe is in the profile folder and DSLRRemotePro Touchscreen action Run script is used to call Selector.jpg Screen welcome.jpg or ready.jpg or part of path + screen name to call the Selector Screen every time DSLRRemotePro changes to this screen. You can separate several trigger by using | char (Example: Trigger|Stripes\ready|Guestbook\ready).
SENDKEY (optional):
F4 = Start of Photobooth Sequence from ready.jpg
F6 = Switch to ready.jpg if trigger is welcome.jpg
leftClick,x,y = left mousebutton x pixels from left and y pixels from top
F1 F2 F3 F4 F5 F6 F7 F8 F9 F10 F11 F12 Enter Tab Insert Delete Space ESC
Shift Ctrl Alt+any of those keys
Example:
Sendkey=F4 (Guest will not see the ready screen and does not have to start the process manually, but process starts automatically after all background images have been selected)
Exit application with right click on icon in monitor check box (exit) or press “end” key on your keyboard and start with double click on file LayoutSelector.exe in your LayoutSelector folder.
SOURCE:
Names the folder with background images. Type in the path of your background images (i.e. C:\temp) or just type in the folder name (e.g. layouts) if situated in the LayoutSelector folder. (Part matches in terms are possible).
Search order for SEL_, BG_,LOV_ and OV_ Files will be found in the following order:
1. Imagepath\Layoutselector of the current DSLRRemotePro Profile
2. Sourcepath in the Settings.ini file that is found in script startup path
3. Script startup path
SEL_ Images are displayed on selection screen
BG_ Images are copied to profile imagepath with name greenscreen_background.jpg and if multiselect greenscreen_background_#.jpg
LOV_ Images are copied to profile imagepath only if singleselect with filename = live_view_overlay.png
OV_ Images are copied to profile imagepath only if singleselect with filename = overlay.png
CROP THUMBNAILS:
The thumbnail files are croped in the aspect ratio defined.
This will asure that the selection screen looks clean even if the BG_Files have different aspect ratios.
Crop=none No croping
Crop=1:1 square
Crop=2:3 camera ratio horizontal
Crop=3:2 camera ratio portrait
Crop=3:4 3:4 ratio horizontal
Crop=4:3 3:4 ratio portrait
AUTOREFRESH THUMBNAILS:
If True, the thumbnail are deleted each time LayoutSelector is started.
If False, you need to delete the thumbnails folder manually when you change the Files in Layouts Folder.
RefreshThumbnails=True/False
MULTISELECT:
Default = true
True: If more than one photo is possible in a profile, the guest can select a different background image for each photo. The sequence can be selected (number of sequence shown in upper left corner of background), multiple choice is possible, a reset is possible before final selection (reset.png).
False: One (same) background for all photos. No matter how many photos to take in a photobooth sequence., the guest can select ONE background only. In this case OV_ and LOV_ files will be copied as well if available.
PAGETRANSITIONSPEED:
The value defines how fast the change animation (fade in) from one selector page to the next should happen .
I.e. 0=immediately, 100=slow
SOUND:
If required a sound file can be used for different actions in the process like
Change to next or previous page, reset or select
Sound_NextPage = Source\NextPrev.wav
Sound_PrevPage = Source\NextPrev.wav
Sound_Reset = Source\Reset.wav
Sound_Select = Source\Select.wav
GLOBAL VARIABLES:
Can be used in any text message by using {variable}
Day, Month, Year, Hour, Min, Sec
LeftToSelect = How many background images can be still selected
CurrentPage = shows page number if more than one page is available
TotalPages = shows total number of selection pages if more than one page is available
VARIABLES:
Are user defined. If you need a text as a variable, just define it.
Example:
System name=Photobooth_32
Operator=Jürgen_Mayr
Booking_exp=24:00_h
Text on Selector and Selector_N
A text for each selector_n(umber).jpg background screen page can be defined. The selector_n.jpg files must be located in folder
LayoutSelector\Layouts
e.g. selector_1.jpg, selector_2.jpg …
Text
Text defined under [selector_1] in the settings.ini will appear on background screen page no. 1,
text defined under [selector_2] in the settings.ini will appear on background screen page no. 2 and so on
Here you can define text, its layout and its position on the background screen page.
Within these text blocks you can use the standard {variables} and also your individual {variables}.
Example:
[selector_1]
Text1={Hour}:{Min}:{Sec}
Question???
Ask your {Operator}
Photobooth time ends
{Booking_exp}
Text1_Font=Arial
Text1_FontSize=20
Text1_FontColor=000000
Text1Top=40
Text1Left=1050
Text1Option=
Text2={CurrentPage}/{TotalPages}
Text2_Font=Arial
Text2_FontSize=80
Text2_FontColor=bdbdf6
Text2Top=780
Text2Left=650
Text2Option=
TEXT ON_IMAGE_SELECTION
You can define text for each selector.jpg page, text will be shown randomly
Linebreak is <BR>
Use variables with {variablename}
Example:
[On_ImageSelection]
Text=Please go on|Good Choice|Nice Background
Text_Font=Arial
Text_FontSize=30
Text_FontColor=f48f41
TextTop=10
TextLeft=10
TextOption=Bold
TEXT ON_IMAGESELECTION_ONELEFT
This text will be displayed if only one more image background can be selected
You can use random text by using | as a separator between text.
Example
[On_ImageSelection_OneLeft]
Text=Last One|One more…
Text_Font=Arial
Text_FontSize=60
Text_FontColor=fffa00
TextTop=10
TextLeft=10
TextOption=Bold
CAPTIONS ABOVE/BELOW IMAGES
To show the filename without BG_ and .jpg with the selectable image, you can add this text to settings.ini
Example
[CaptionText]
Active=True
Position=Top
OffsetY=-25
Align=center
FontColor=000000
FontSize=14
FontName=Arial
Border=True
BackgroundColor=fbb900
Layout of Selection Screen Pages
Background of Selection Screen Pages
The default background color of selection screen pages is grey if no selector.jpg can be found in the Layouts folder.
A different selector_n.jpg can be defined for each selection screen page.
Selector_2.jpg is a background for selection screen page no. 2, selector_3.jpg is for selection screen page no. 3 ….
A selection screen page for which no selector_n.jpg is defined, will show selector.jpg and if also a selector.jpg does not exist, the background of the selection screen page will be grey (default).
If no selector_n.jpg is defined for a page, the selector.jpg will be used as a default.
Example:
In folder Layouts are
selector.jpg, selector_3.jpg and selector_5.jpg
Page no. 1, no 2 and no. 4 will show selector.jpg as background of the selelction screen page.
Selection screen page no. 3 will show selector_3.jpg and selection screen page no. 5 will show selector_5.jpg
A selector.jpg can also be defined for just one profile. If a selector.jpg is located in the profile folder LayoutSelector it will be executed first (see sequence under Source in the settings.ini).
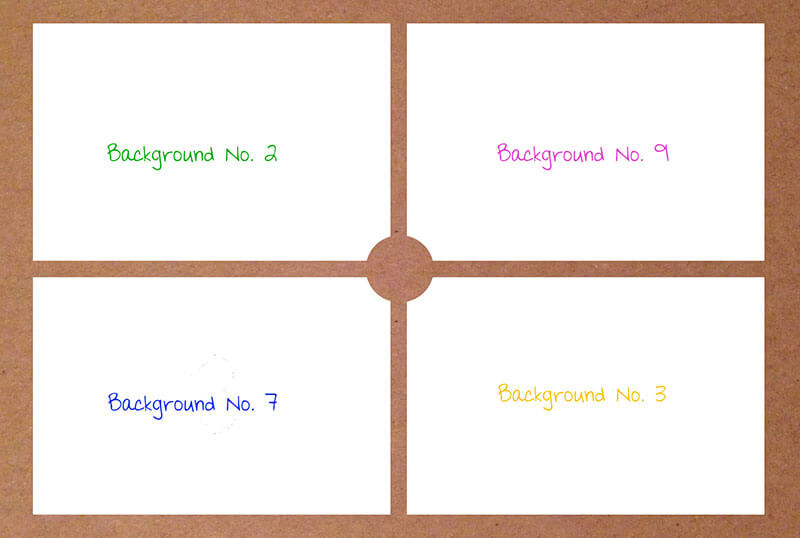
Size and Position of THumbnails and Icons on Selection Screen
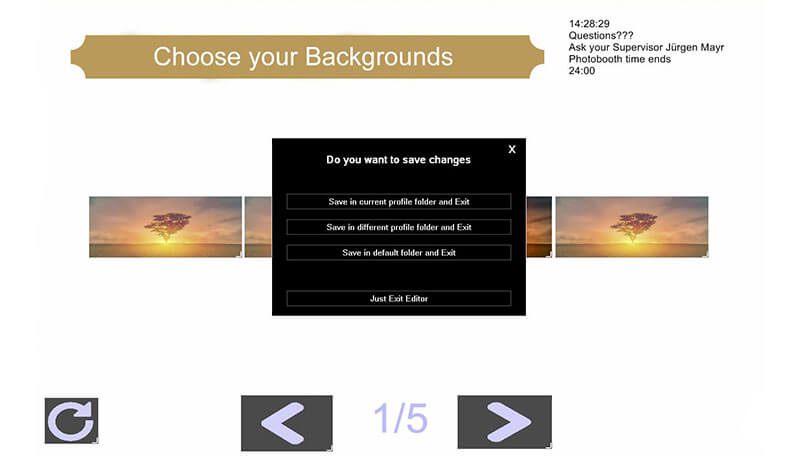
The thumbnails of your background images BG_n appear in rows from left to right. Size, number and position of the thumbnails on all selection screen pages can be modified with STR+E (start of editor) and will be saved in a LayoutSelector.ini file.
Right click into empty screen sections on selection screen opens the menu:
Add New Element
Adds a new place-holder for a thumbnail. The pixel size of height and width of the place-holder can be selected.
The place holder will be filled with the complete thumbnail of the background image. In case the aspect ratio of the thumbnail is not corresponding to the aspect ratio of the background image/thumbnail, a white edge may occur on top and bottom or on left and right of the place-holder.
Delete all Elements
Deletes all place-holders for thumbnails on the background selection screen.
Exit Editor
Exit editor with options
- Save in current profile folder and Exit
- Save in different profile folder ad Exit
- Save in default folder and Exit
Add New Element
Adds a new place-holder for a thumbnail. The pixel size of height and width of the place-holder can be selected.
The place-holder will be filled with the complete thumbnail. In case the aspect ratio of the thumbnail is not corresponding to the aspect ratio of the background image/thumbnail a white edge may occur on top and bottom or on left and right of the place-holder.
Delete Element
Deletes one single element.
Duplicate Element (CTRL+D)
Duplicates place-holder with the same size and aspect ratio.
Add/Remove Element in Group (G)
Selects place-holders for further action. A small blue square will appear on the left top of the selected place-holder.
Change Size (CTRL+S)
Changes the size of selected thumbnails (G).
Align Elements in Group Vertically (ALT+V)
Aligns selected elements (G) vertically.
Elements in Group Horizontally (ALT+H)
Aligns selected elements (G) horizontally.
Center Group Vertically (CTRL+V)
Centres selected elements (G) vertically.
Center Group Vertically (CTRL+H)
Centres selected elements (G) horizontally.
Space between Elements in Group Vertically
Vertical space in pixels between selected elements can be selected.
Space between Elements in Group Horizontally
Horizontal space between selected elements can be chosen in pixels.
Icons
Icons for actions can be found in the LayoutSelector folder. These are NextPage.png, PrevPage.png and Reset.png.
You can use your own symbols/png files, just replace the files and name them exactly as before (NextPage.png, PrevPage.png and Reset.png).
Icons for actions on selection screen pages can be moved and resized with the screen pages editor (STRG+E). Drag or pull up with your mouse accordingly.
Depending on existing number of selection screen pages the application regulates itself, whether to show icons for next or previous page and realizes first and last page as well as one page only.
Number of pages
Page number and total number of pages as well as its position can be defined in the Settings.ini (TEXT ON SELECTOR and SELECTOR_N).


Different Options
Single Select – Selection of one single background for all photos
Open LayoutSelector\settings.ini and change settings:
Trigger=Trigger|YourProfile1\ready|YourProfile2\ready|YourProfile3\ready
(Please fill in as many profiles as you are using. Use your own profile names for YourProfile1, 2 and 3)
Multiselect=false
The guest can select only ONE background out of all background images. All photos (number depending of profile) will be taken with the same selected background.


In Single Select Mode (Multiselect=false) also the SEL_, BG_, LOV_, and OV_ files are being copied to your profile and renamed Greenscreen_background.jpg, live_view_overlay.png, live_view_overlay.png in order to use these files on your photobooth screen. Please make sure to use identical terms in your layouts folder for your files belonging together such as: SEL_01.png, BG_01.jpg, LOV_001.png and OV_001.png for the same background image.
This option allows the use of overlay images on your photobooth screen and is available whenever just ONE single background for all photos can be selected (also with Multiselect=true if just ONE photo will be taken and ergo ONE background has been selected).
Multi Select – Selection of a number of different backgrounds
Open LayoutSelector\settings.ini and change settings:
Trigger=Trigger|YourProfile1\ready|YourProfile2\ready|YourProfile3\ready
(Please fill in as many profiles as you are using. YourProfile1, 2 and 3 are place-holders)
Multiselect=true
The layout selection screen will be shown in all profiles above.
The photobooth guest will now be able to select different background images for each photo to be taken.
Multiple choice is possible as well. Sequence can be changed.
LayoutSelector detects the correct number of background images from your DSLR Remote Pro profile (xml file). After the selection of all background images has been completed LayoutSelector switches to ready screen (if no Sendkey has been set in the settings.ini).
Semi Select – Selection of order out of a predefined number of backgrounds (according to profile)
Open LayoutSelector\settings.ini and change settings:
Trigger=Trigger
Multiselect=true
Copy your background images into folder (number of backgrounds according to number of photos to be taken):
YourProfile1\LayoutSelector, YourProfile2\LayoutSelector, …
The guest can select the order of backgrounds. The number of possible backgrounds for selection is fixed according to profile. Multiple choice is possible.
Example:
4 photos can be selected in this profile. Here No. 4, 6, 7 and 11 have been predefined by putting them into folder LayoutSelctor in the applicable profile.

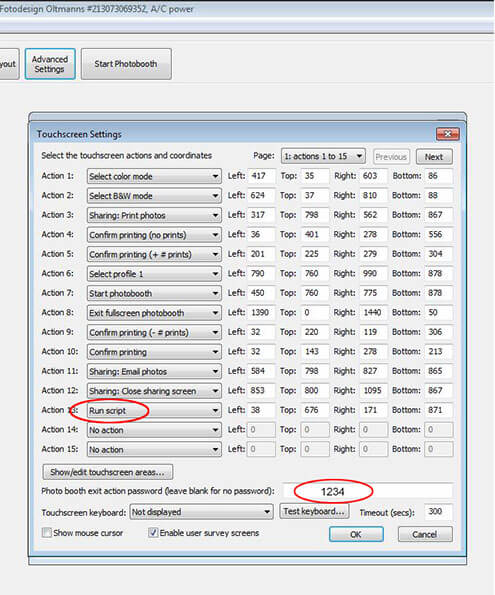
Run script and run script (password)
Run script and Run script (password) can provide the trigger function on a defined touchscreen area on welcome.jpg and ready.jpg in a profile. To execute Run script or Run script password the script_Trigger.exe has to be located in all profiles where you like to use it.
Run sript (visible) on Touchscreen Area in Multiselect Mode
With this trigger option the selection of background images from the selection screen can be changed, also after the complete number of possible backgrounds has been selected already
(in contrast to Reset.png – here a reset is possible only before the last background image has been selected).
Open LayoutSelector\settings.ini and change settings:
Trigger=Trigger|YourProfile1\ready|YourProfile2\ready|YourProfile3\ready
(Please fill in as many profiles as you are using. YourProfile1, 2 and 3 are place-holders)
Multiselect=true
Copy file script_Trigger.exe, .bat or .ahk to all DSLR Remote Pro profiles you are using.
Define a touchscreen area on your welcome or ready screen in each profile and add action Run script.
Do not forget to provide a button for the Run script action on your ready/welcome screen in each profile..
This option may be used for coin operated machines in order to provide a reset for the guest at any time in the process before taking the picture. You may decide to drop the Reset.png in this case.
Run script (password) Action (hidden) on Touchscreen Area
This combination of Trigger, Multiselect and Run script allows a Semi Select on Touchscreen as a hidden function for operators and allows easy change of backgrounds.
Open LayoutSelector\settings.ini and change settings:
Trigger=Trigger
Multiselect=true
Copy file script_Trigger.exe, .bat or .ahk to each DSLR Remote Pro profile folder you are using.
Define a touchscreen area on your welcome or ready screen in each profile and add action Run script (password).
Do not show a button for the Run script action, but choose and fill in your password in the touchscreen settings of each profile in DSLR Remote Pro.
Keep in mind to provide this action in all your profiles where you like to use it. The operator will then be able to easily predefine different background images in each profile in question by touching the screen on the hidden area.
Different combinations with LayoutSelector
Complex arrangements and many different combinations are possible by using a LayoutsSelector folder in your profiles. You will be able to define different options for each profiles, e.g. different background images, different layouts and text messages for your thumbnail previews (LayoutSelector/selector.jpg).
Profile 1 will use the content of its own LayoutSelector folder (pink), Profile 2 and Profile 3 work with LayoutSelector in blue according to sequence set in the settings.ini (SOURCE).
Please note:
Changes in the settings.ini will be effected after a restart of LayoutSelector only
To restart the application right click on icon in monitor checkbox (exit) or press “end” key on your keyboard and restart with double click on file LayoutSelector.exe in your LayoutSelector folder.
