What exactly does the Photobooth Gallery Plugin for WordPress do?
Short and sweet: It enables a GDPR-compliant online gallery in which each guest can only access the images for which they know the so-called FotoPIN.
The FotoPIN is usually a combination of 3 letters and 5 numbers (eg ABC12345 or WZQ22521). Every jpg, gif, png or mp4 file gets this FotoPIN as part of the filename.
In DSLRRemotePro this is done fully automatically via the {uid} = uniqueID token.
If the file name is 20181105_113500_WZQ22521.jpg and the guest enters WZQ22521 in the search window of the online gallery, then he will find exactly this image.
Will the file name be one Gallery code extended, then the guest can only view his picture and the client can view and download all pictures with a code.
20181105_113500_MUT05112_WZQ22521.jpg
20181105_121131_MUT05112_UZP65482.jpg
20181105_131116_MUT05112_BVM62214.jpg
MUT05112 is the gallery code for all three images.
WZQ22521, UZP65482 and BVM62214 are the photo PINs for the three individual photos.
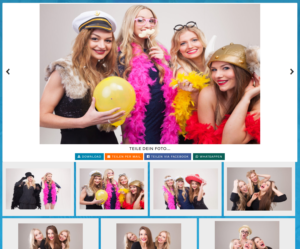
This is what it looks like in practice:
https://photobooth-deluxe.de/bilder-ausgabe/
The PIN for full gallery access is: ABC12345
search

Results page
Documentation of the plugin
[Contents]
1. Installation of the plugin in WordPress
1.1. Upload and activate the plugin
1.1.1. Upload WordPress backend
1.2. Verify entry of serial number / plugin
2. Configuration of the Photobooth plugin
2.1. Default configuration of the plugin
2.1.1. media folder
2.1.2. Regular Expression (Standard)
2.1.3. Wildcard in search mask
2.1.4. Headline for social links
2.1.5. Subject on social links
2.1.6. What should be shared?
2.1.7. Pictures per page
2.1.8. Introtext form
2.1.9. Note text for incorrect code entry
2.1.10. IP Blocker
2.1.11. Notice text if IP has been temporarily blocked
2.2. Configuration for different events / folders
2.3. Masterkey
2.4. Editorial mode / AdminCode
3. Integration of the search mask in the website
3.1. Use of the shortcode
3.2. Customize the layout
4. Statistical evaluation of events
1. Installation of the plugin in WordPress
1.1. Upload and activate the plugin
- Navigate to the WordPress backend under Plugins> Installed Plugins
- Now click on the “Install” button and then on “Upload plugin”
- Now click on “Choose file”, select the “photobooth-gallery.latest.zip” file on your computer and click on “Install now”
- The plugin will now be uploaded and installed automatically
- To activate the plugin click on “Activate this plugin”
1.2. Verify entry of serial number / plugin
With your purchase of the plugin you will receive a personal license key and an order ID for the selected verified domain and the license period you have selected.
- In your WordPress backend, navigate to Photobooth Gallery> General Settings
- Enter the license key and the order ID from the order email in the fields provided License key and Purchase ID and click “Update” on the right to save
2. Configuration of the Photobooth Gallery plugin
2.1 General Settings
The following settings are under Photobooth gallery > General Settings to find.
To save your entries, click on “Update” on the right.
2.1.1.
If this option is activated, we will receive an email from your WordPress in the event of an error. In addition to the error message, this email contains the system information from above and the current log file. This enables us to better support you in handling and identify bugs.
2.1.2. License key
With your purchase of the plugin you will receive a personal license key and an order ID for the selected verified domain and the license period you have selected.
Enter the license key and the order ID from the order email in the fields provided License key and Purchase ID on.
2.1.3. Logfile prefix
The plugin saves various information (GDPR compliant) about usage in the log file. in The Field Logfile prefix a prefix must be specified for the file name. This prevents unauthorized access to the log file.
2.1.4. Logfile location
This area shows the current size and status of the log file. The current log file can be called up or saved using the link next to it.
2.1.5. Regular upload folder scan
Yes means that every 5/15/30 minutes (depending on the set scan interval) a search is automatically made for new images in the upload folder and these are imported into the WordPress media management. The import of new files is also triggered if a previously unknown FotoPIN is entered.
2.1.6. Maximum Social Media Share Age
Minimum age at which a shared file was last accessed before it can be deleted from the library. Standard: 30 days
This function prevents the share links that are still actively used from becoming invalid. In the standard system, a shared image can only be deleted from the media library if no one has clicked on the shared link for 30 days.
2.1.7. Activate Auto Clean Up
With the Auto Clean Up function, images can be automatically deleted from the media library and thus also from the online gallery after a certain period of time. So you no longer have to worry about "creating space on the web space".
2.1.8. Activate webhook for updates
If this function is activated, a URL appears with which the upload scan can be activated manually (regardless of the selected scan interval).
2.1.9. Advanced GEO data tracking
If this function is activated, an API key must be entered by www.ipstack.com. This can be used up to 10,000 requests per month free of charge.
The information is used for the GDPR-compliant usage statistics of the gallery. Instead of the IP address, the geographical region of this IP address is saved. No conclusions about individual users can be drawn from this information. However, a geographical distribution display of the accesses is still possible.
2.1.10. Allowed multimedia files
This determines which file types are allowed in the gallery.
JPG, GIF, PNG and MP4 are available.
2.1.11. Delete multimedia files
If so, the uploaded images and video data will be deleted from the import folder after they have been successfully imported into the WordPress media library.
2.1.12. Clean up the media library ATTENTION !!!
This is the reverse function of data import. All (also shared) gallery images will be deleted from the WordPress media library and the original images will be copied back into the import folder.
With this function ALL imported gallery pictures and videos are removed from the media library and they CANNOT BE IMPORTED with the same file name.
Use this function with the utmost CAUTION.
2.1.13. Images transfer
Click on Scan now activates the import process. This is the same action at the regular upload folder scan and at the Webhook URL is performed.
2.2. Multi-event configuration
Note: Normally only one configuration has to be created for all events. A separate configuration does NOT have to be created for each photobooth application.
Would you still like to create a different configuration for an event that has nothing to do with your normal setting? No problem.
click on Photobooth Gallery> Configurations
A new page will now open with a default Configuration is created.
By clicking on default or Add New come to the settings that can be made for each configuration.
2.2.1. Media folder
The plugin automatically detects the server path of your WordPress installation. In the text line, only enter the desired subfolder (e.g. images or gallery) in which your images to be imported are to be stored. If the option Create media folder automatically is set to Yes to the right, this folder will be created automatically.
Please only enter a folder name and no folder structure. This is NOT necessary for the operation of the gallery.
It is located in the wp-content subfolder of the current WordPress installation.
Ideally, an FTP user is now created for this folder. This is required to transfer the data from the photobooth to the online gallery.
2.2.2. Regular expression
Each picture must be loaded into the gallery with a unique code (FotoPIN). With regular expression you can define your personal code sequence. You can choose between letters [AZ] and numbers [0-9]. The Breeze {uid} = uniqueID consists of 3 letters followed by 5 numbers. The regular expression then looks like this: [AZ] [AZ] [AZ] [0-9] [0-9] [0-9] [0-9] [0-9].
The Breeze Token {uid2} with 5 letters and 3 numbers must be [AZ] [AZ] [AZ] [AZ] [AZ] [0-9] [0-9] [0-9].
The number of positions specified in the regular expression determines the autosubmit of the input field.
Note: Only uppercase letters may be used (the input field automatically converts lowercase letters into uppercase letters).
2.2.3. Admin code
For a direct moderation of the online gallery there is the possibility to delete media files (pictures / videos) directly in the front end of the website. To do this, under the area in the backend Admin code a personal code can be entered.
Call up the gallery of the event using the gallery code or a photo pin and append the following to the URL: ? PBGADMIN = Admin Code
The personally created “AdminCode” must of course also be used here. If the URL is now called up, you will get an overview of all files that match the FotoPIN. In addition, there is a small checkbox for each picture. If this is activated, you can confirm the new option in the frontend Delete selected images the selection can be permanently deleted. It is of course possible to select and delete several media files at the same time.
Gallery access with admin code is not recorded in the statistics.
2.2.4. Placeholder for the code field
Here you can specify a text which will later be displayed on your website in the image search mask. We recommend here, for example, “Please enter the photo PIN here”.
2.2.5. Activate Preview Gallery
Activates a new shortcode via which the complete gallery of this configuration can be displayed without entering a code. Please note DSGVO!
This function makes it possible, for example, to monitor several events at the same time, since all images that are read in via this gallery configuration are displayed independently of the photo pin.
2.2.6. Autoscroll on click
The browser scrolls back to the main view after loading the clicked image. Useful when using a gallery code in the mobile view.
2.2.7. Allow direct code entry
Allows the code to be entered via the URL. The code has to be entered as follows: www.domain.de/mein-beitrag/pg-code/font>der-code}
This function is necessary if the image is to be called up directly via a dynamic QR code, for example.
2.2.8. Enable social media
If the function is activated, five new input blocks appear in the configuration.
2.2.8.1. Heading on social media links
Headline over the social media links
2.2.8.2. Subject for sharing via social media
Preset Subject / Subject / Title when sharing an image
2.2.8.3. Description for social media
Preset body / text when splitting an image
2.2.8.4. Set the view page
In order for the images to be shared, the following shortcode
No settings found! Please configure at least one Photobooth Gallery configuration here
be inserted into a page. Once you have inserted the shortcode, please select the appropriate page here. Please adjust the optionalparameter settings and anchor according to this configuration.
2.2.8.5. Social media buttons
The following interactions are possible and can be made available to guests:
- download
- Download Gallery (Download all images as ZIP files. This function is not available on all systems and is therefore not a guaranteed function.)
- Facebook Messenger (mobile only)
- Google Plus
- Linked-In
2.2.9. iOS Video Shipping E-Mail Address
Due to the limitations in downloading MP4 videos on iOS devices (Iphone, IPad), these video files will be sent to the user via email. Please enter the sender e-mail address from which you would like to send the e-mails. So that e-mails sent in this way do not end up in spam, please use an e-mail address with the current website domain.
2.2.10. Introtext for the form
This text field can be used to place a heading, text or images directly above the form for entering the FotoPIN.
2.2.11. Error message for incorrect code entry
The plug-in automatically checks whether the entered FotoPIN is valid and a file with this information (pin = part of the file name) can be found in the media library. If the PIN is entered incorrectly or there is no picture with this PIN, this message will be displayed. This can be, for example, “Attention! The entered code does not seem to be correct or the picture is not yet online. "
2.2.12. Enable IP blocking
With the IP blocker, the plugin offers the option of blocking an IP address if there are too many unsuccessful attempts. Here you can define how many unsuccessful attempts are allowed within a certain period of time. A setting of a time period in seconds and unsuccessful attempts within this time can be entered here. In the wrong Notice text if the IP has been temporarily blocked a message can be issued to the user.

2.3. Masterkey / gallery code
A masterkey, also called gallery code, is used to work with a single code all pictures to retrieve an event.
The prerequisite for this is that each uploaded file has this code as part of the file name.
From Breeze DSLRRemotePro 3.7.2 you can use the function File => Photobooth event info... used.
The following example uses the field with Event name used to set the master key / gallery code.
If Martina and Tom get married on February 3rd, 2018, the masterkey will be MUT03022 for Martina and Tom and the first 5 digits of the date.
The content of the field Event name can now be used with the {eventName} token in the file name. (see chapter 4)
3. Include the search mask in a WordPress page
3.1. Using a shortcode
The shortcode to be inserted is at the top of the range for each individual configuration manual to find.
The parameter anchor is optional and can also be deleted if it is not used.
Example of the standard shortcode:
No settings found! Please configure at least one Photobooth Gallery configuration here
If this shortcode is inserted on a WordPress site, the input mask for the gallery appears at this point.

3.2. Customize the layout
Basically, it is possible to edit all elements that are displayed in the front end. All you have to do is enter the adapted lines of code in the css area provided.
Usually you can find this either under:
Design> Customizer> Additional CSS
... or the theme used has its own area for it. In addition, there are also free plugins that enable a so-called custom css area.
You can make design adjustments at the certified agency www.codevisio.io let implement.
4. Statistical evaluation of events
From version 3.1. a comprehensive statistics module is available in the online gallery.
With the installation of version 3.1. will automatically create a page named photobooth-gallery-statistics-page created.
When calling, the parameter / pg-code / CODE / must be passed. Instead of CODE, enter the event code, e.g. ABC12345.
The statistics then only take into account data belonging to this event code.
When calling, the parameter / pg-code / CODE / must be passed. Instead of CODE, enter the event code, e.g. ABC12345.
The statistics then only take into account data belonging to this event code.
Statistics with sample values can be seen at the following URL: https://photobooth-galerie.de/pbg-statistics/pg-code/ABC12345/
ATTENTION: This page is automatically overwritten with each update in order to insert new values.
Your own modifications are then lost. The remedy here is to copy the page and make changes manually in new versions.
Your own modifications are then lost. The remedy here is to copy the page and make changes manually in new versions.
data Source
1. The DSLRRemotePro XML files ([XML]) written with each sequence.
2. Social media interactions ([Social Media]) via the online gallery
3. The interactions on the Gallery (User Logfile) ([Gallery])
Elementor widgets
1. Number Widget
2. Progress Bar widget
3. Image Widget
Combinations in the widgets
View Type (Always works in conjunction with a data source)
Shared, Viewed: Used for social media interactions (origin 2) to differentiate between views (who viewed my shared picture) and shares (who shared a picture)
Unique: Here all views are recorded uniquely, ie multiple views from origin 2 are only counted once (unique downloads: how many different images were downloaded)
Average: Uses the event duration (see photobooth-statistics-event-duration) to change data from origin 3.
Works only with XML data
Image Widget
With {size} the calculated number can be displayed (most frequent photo) (in the caption)
shortcodes
Date shortcodes
1. photobooth-statistics-sharing-from "Date on which a picture / video was shared / viewed for the first time"
2. photobooth statistics sharing to "Date on which a picture / video was last shared / viewed"
3. photobooth-statistics-event-from "Start date of the event based on the date of the first XML file of the event"
4. photobooth-statistics-event-to "End date of the event based on the date of the last XML file of the event"
The following parameters can be used:
- date-format: Formats the date accordingly http://php.net/manual/de/function.date.php
- the-code: If a fixed code is required, otherwise the / pg-code / parameter is used, or no code at all
Event shortcodes
1. photobooth-statistics-event-duration "Calculates the time between the start and end date of the event in seconds and returns a formatted text, or the time in seconds (see parameters)"
The following parameters can be used:
- the-code: If a fixed code is required, otherwise the / pg-code / parameter is used, or no code at all
- format: Should the output be reformatted in days, hours and minutes (default: true), otherwise seconds will be returned
2. photobooth-statistics-event-profiles "Shows the profiles used and their frequency for the event in a small table"
The following parameters can be used:
- class: The CSS class of the table
- the-code: If a fixed code is required, otherwise the / pg-code / parameter is used, or no code at all
5. Settings in DSLR RemotePro / NK Remote
Step 1: Define the filename of the single images in Breeze
in the menu File => Preferences will the Filename prefix eg with the value% d_% t_ {eventName} _ {uid} _ pre-assigned.
% d = Translated by the photo-smoothing software into the current date in the form YYYYYMMDD.
% t = Is being converted by the Photobooth software into the current time HHMMSS.
{eventName} is the value of the event_name field from the Menu File => Photobooth event info ... (the three Bigletters and five numbers are then the so-called masterkey / gallery code with which all pictures of the event can be viewed).
I usually define the gallery code from the name and date of the event. So if Martina and Tom get married on February 3, 2018, my gallery code will be MUT for MArtina Und Tom and 03022 are the first 5 digits of the date.
The entry {uid} is replaced by the photo booth software with each sequence with a new random code which also consists of three letters and five numbers.
For a 4-collage, the names of the individual shots are as follows:
20180203_201500_MUT03022018_ABC12345_01.jpg
20180203_201500_MUT03022018_ABC12345_02.jpg
20180203_201500_MUT03022018_ABC12345_03.jpg
20180203_201500_MUT03022018_ABC12345_04.jpg
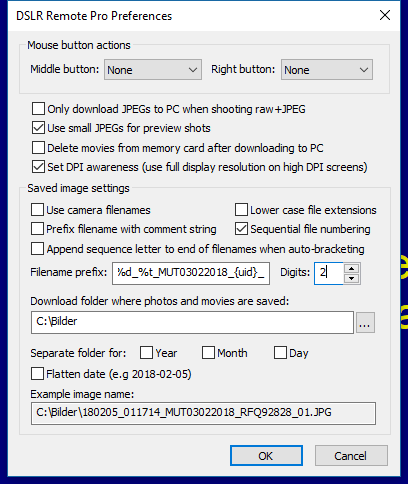
In Advanced Settings load the desired profile and then under Output Settings as filename% d_% t_ {eventName} _ {uid} in the field Filename for JPEG copy of output enter.
In the above example, the name of the final file in the prints folder is then 20180203_201500_MUT03022018_ABC12345.jpg
Note: If the time of the file in the prints folder differs from the time of the individual pictures, then the time on the camera does not match the computer time. The file in the prints folder uses the camera time.
In the DSLRRemotePro menu Camera => Set date / time and owner string the camera can be synchronized with the computer.

6. Logfile
An entry is written to a log file for each action. This is located in the respective media folder and is called “PBG_Protokoll.log”.
The structure of the log file is:
1st year (4 digits) - month (2 digits) - day (2 digits)
2nd hour: minute: second
3rd action
4. Photo Pin
5.File name of the image
6. Hashed file name of the image for share actions
Examples of log entries:
Display the search mask:
“2017-06-12”; ”16:58:48”; ”Form display”; ””; ””; ””
Display of the results page with the image overview:
“2017-06-12”; ”16:58:56”; ”Media overview (page 1)”; ”BNT31396”; ””; ””
Copy the image to the sharedImages folder:
“2017-06-12”; ”10:58:00”; ”File copied”; ”BNT31396”; ”pbd_BNT31396.jpg”; ”b94d750b838f1bb44e85960524a6b03b.jpg”
Download the picture:
“2017-06-12”; ”10:58:00”; ”Download”; ”BNT31396”; ”pbd_BNT31396.jpg”; ”b94d750b83 f1bb44e85960524a6b03b.jpg”
Display a file:
“2017-06-12”; ”16:58:57”; ”Media Display”; ”BNT31396”; ”pbd_BNT31396.jpg”; ”b94d750b838f1bb44e85960524a6b03b.jpg”
Share action of a file on the specified channel:
“2017-06-11”; ”10:17:40”; ”Share: StumbleUpon”; ”XYZ12345”; ”XYZ123456.mp4”; ”8b31b3d5db3f92b9910cf51a901e7fd7.mp4”
“2017-06-11”; ”10:51:41”; ”Share: E-Mail”; ”CAA39373”; ”150221_194002_CAA39373.jpg”; ”e3752cd3c2ff833b27127336173f62ff.jpg”
7. Automatic Upload with UploaderPro
With version 3.1.2 of the online gallery an HTTP uploader was developed that transfers the necessary files fully automatically to the gallery.
So it will be NO FTP user and no additional software is required.
The UploaderPro can be placed in the autostart and automatically recognizes in which folder DSLRRemotePro saves the images, XML files, videos and Co. For other software products, the folders to be monitored can be specified in the Settings.ini file.
If a new file appears in the folder to be monitored, it is transferred to an upload queue after a preset waiting time. This ensures that no files are lost or uploaded even in the event of a power failure or an unstable internet connection.
You can also set which files should be transferred. The following settings are made in the standard configuration after the download (where comes soon):
= True Prints
Originals = true
XML = true
MP4 = true
GIF = true
Processed = true
So all final results generated by DSLRRemotePro are transmitted.
Download the UploaderPro
In the WordPress backend, there is the section Webhook Uploader under the general Photobooth gallery settings.
There you can change the randomly assigned password to your own under Webupload Password. Important: only letters (lower case) + numbers.
To the right of it, the target configuration for which the uploader should be valid can be selected. Since every configuration has its own upload folder in the file system, the UploaderPro knows in which directory it should save the files.
Click on Download UploaderPro to download a zip file. These just unpack somewhere on the photo box and the UploaderPro.exe To run. A link to this EXE file can also be placed in the Windows autostart.
A few more settings can be made in Settings.ini. The basic settings are selected in such a way that all results from DSLRRemotePro are transferred to the gallery.

Adjust the UploaderPro settings
The UploaderPro.exe folder also contains a Settings.ini file. In each case the Settings.ini from the folder of the EXE file is used.
So you can save on a photo box several different configurations in different folders.
The following settings can be changed in this Settings.ini:
Silent = True UploaderPro only starts as a small icon in the tray bar
Silent = False UploaderPro starts with the visible upload status
Prints = true / false; Upload the collages from the Prints subfolder (the default)
Originals = true / false; Original files of the camera
XML = true / false; XML files that are generated with each sequence (important for statistics)
MP4 = true / false; MP4 videos from the prints or GIF sub-folders
GIF = true / false; GIFs from the prints or GIF subfolder
Processed = true / false; Jpg files from the processed subfolder
A delay can be set for each upload type. The value is given in seconds.
This is important, for example, if a file is still being edited by an external script such as Breeze2GSW.
Prints_Delay = 3
Originals_Delay = 30
XML_Delay = 3
MP4_Delay = 3
GIF_Delay = 3
Processed_Delay = 3
If you want to transfer files from another source (e.g. DSLRBooth, Breeze HotfolderPrint ..) to the gallery with the help of the UploaderPro, then any number of so-called watch folders can be created for this. So folders that are monitored by the UploaderPro for new files. The following block must be completely created for each folder.
[WatchFolder_name1]
Active = true / false
\ \ Photos: localpath = C
Filter = *. *
Subdirs = true / false
Delay = 3
ExcludePath = optional
IncludePath = optional
[WatchFolder_name1]; Any name can be entered in the square brackets. Please do not use spaces or special characters.
Active = true / false; This folder is only monitored if it is set to true.
Localpath = c: \ yourpath; The local folder to be monitored
Filter = *. *; Definition of certain file types to be uploaded. *. * stands for all files in the folder. * .jpg = only jpg files
Subdirs = true; Specifies whether sub-folders (e.g. date folders) should also be monitored.
Delay = 3; Delay in seconds before a new file is added to the queue.
Excludepath = prints | proc; Folders with the name prints or proc are ignored. Multiple folders can be accessed through | be separated.
Includeepath = prints | proc; Folders with the name prints or proc will be uploaded, the rest will be ignored. Multiple folders can be accessed through | be separated.
Please note that includepath and excludepath are mutually exclusive.
Known Issues:
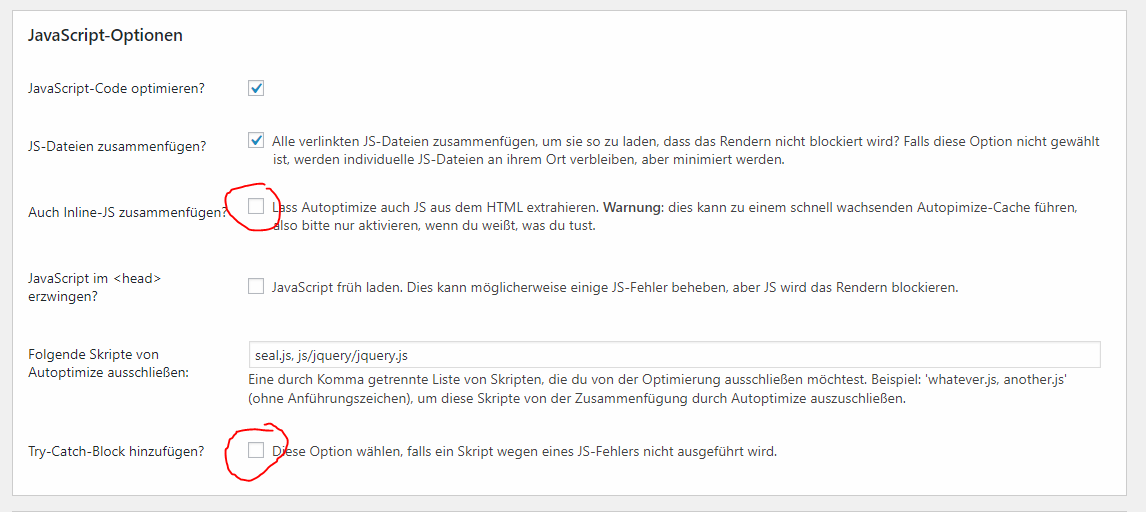
Auto Optimizer Plugin
The functions marked in red must NOT be activated.
WP Hide Plugin Updates and Warnings
This plugin means that the online gallery CANNOT be activated.
Bootstrap version conflict
In rare cases it can happen that bootstrap is installed by several plugins. In this case, you can circumvent any version conflicts by disabling Bootstrap in the Photobooth Gallery Plugin. This feature is not suported !!!

Use with DSLRBOOTH
With DSLRBooth the usage looks like this:
Alternative A:
Unfortunately, the file name of DSLRBooth can not be influenced at the moment. It consists of date_time_3digitNumber.jpg.
You can use this relatively long file name as a code and print it on the picture.
Alternative B:
The files can be given a new, shorter file name via Breeze Hotfolderprint.
Also with Breeze Hotfolderprint you can print on a receipt printer the Downloadlink + FotoPin.
Alternative C:
DSLRBooth makes only the photo and the printout of the photo incl. Short FotoPIN is completely done by Breeze HotfolderPrint.
Then, however, each picture is printed.